Content of this topic
Note: If the software has not been configured for you in advance, you will not receive optimal results from the automatic metadata extraction. The reason for this is that there are only a few preset metadata and properties in the system. For better results, you need to transfer your metadata to the system.
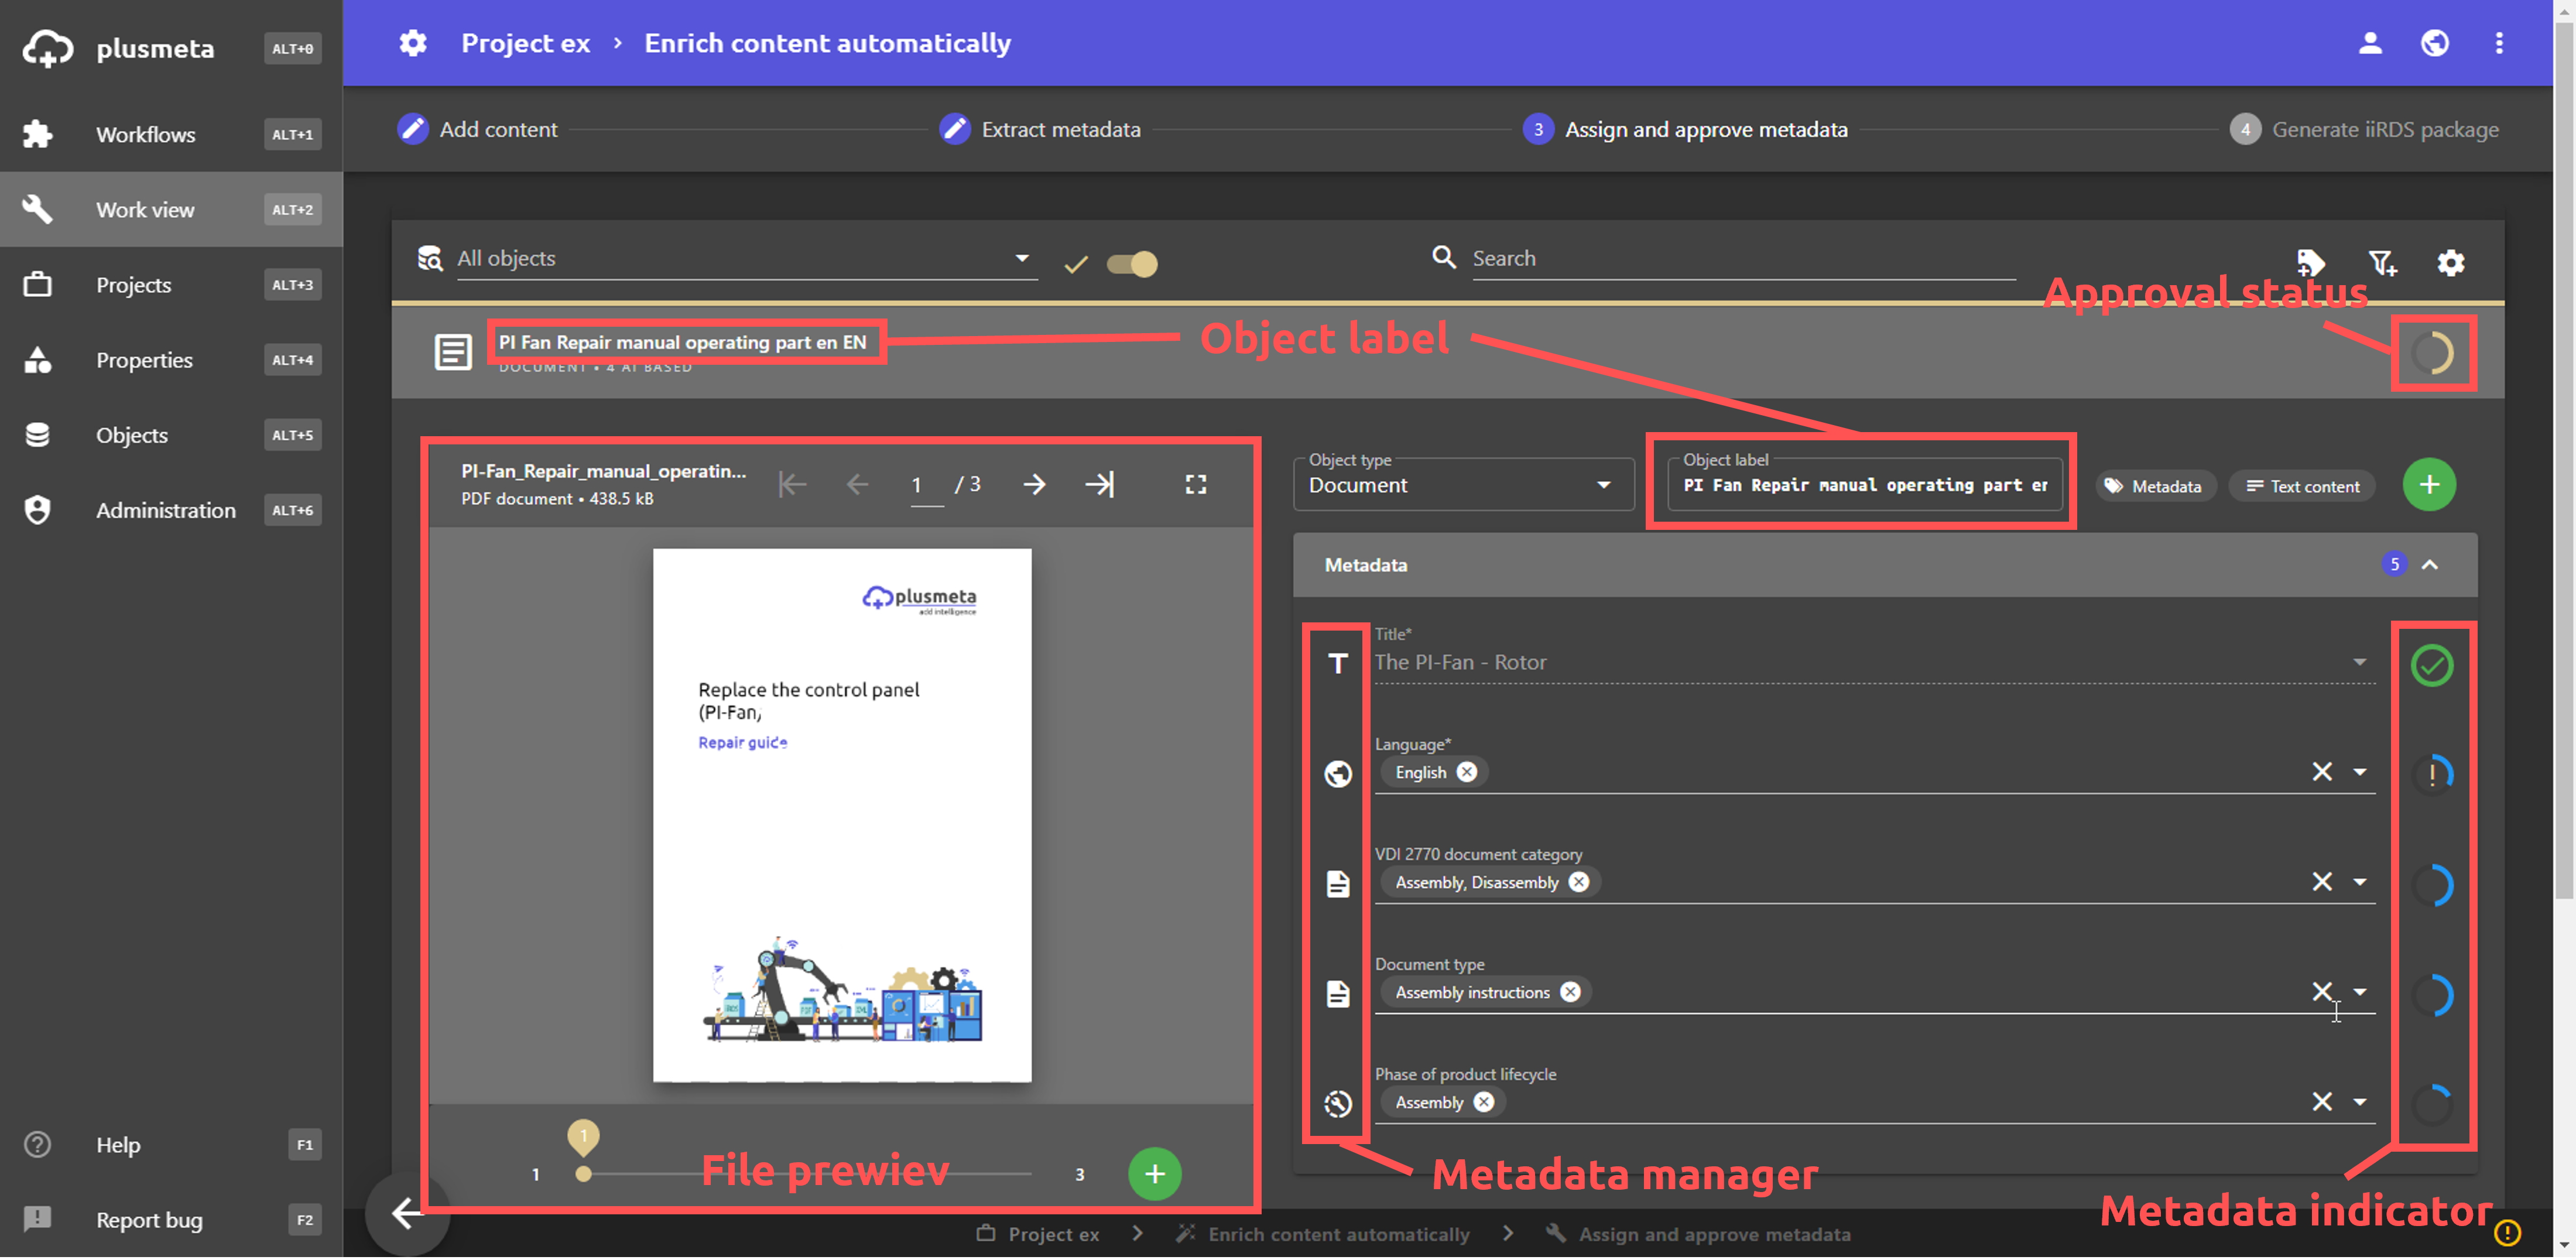
In the Assign and approve metadata workflow step, you can view and remove the metadata extraction results. You can also modify extracted metadata and add additional metadata.

Layout
At the top is the settings bar, which primarily offers filter options and view settings. The objects are listed below. Clicking on an object opens the detail view for this object.
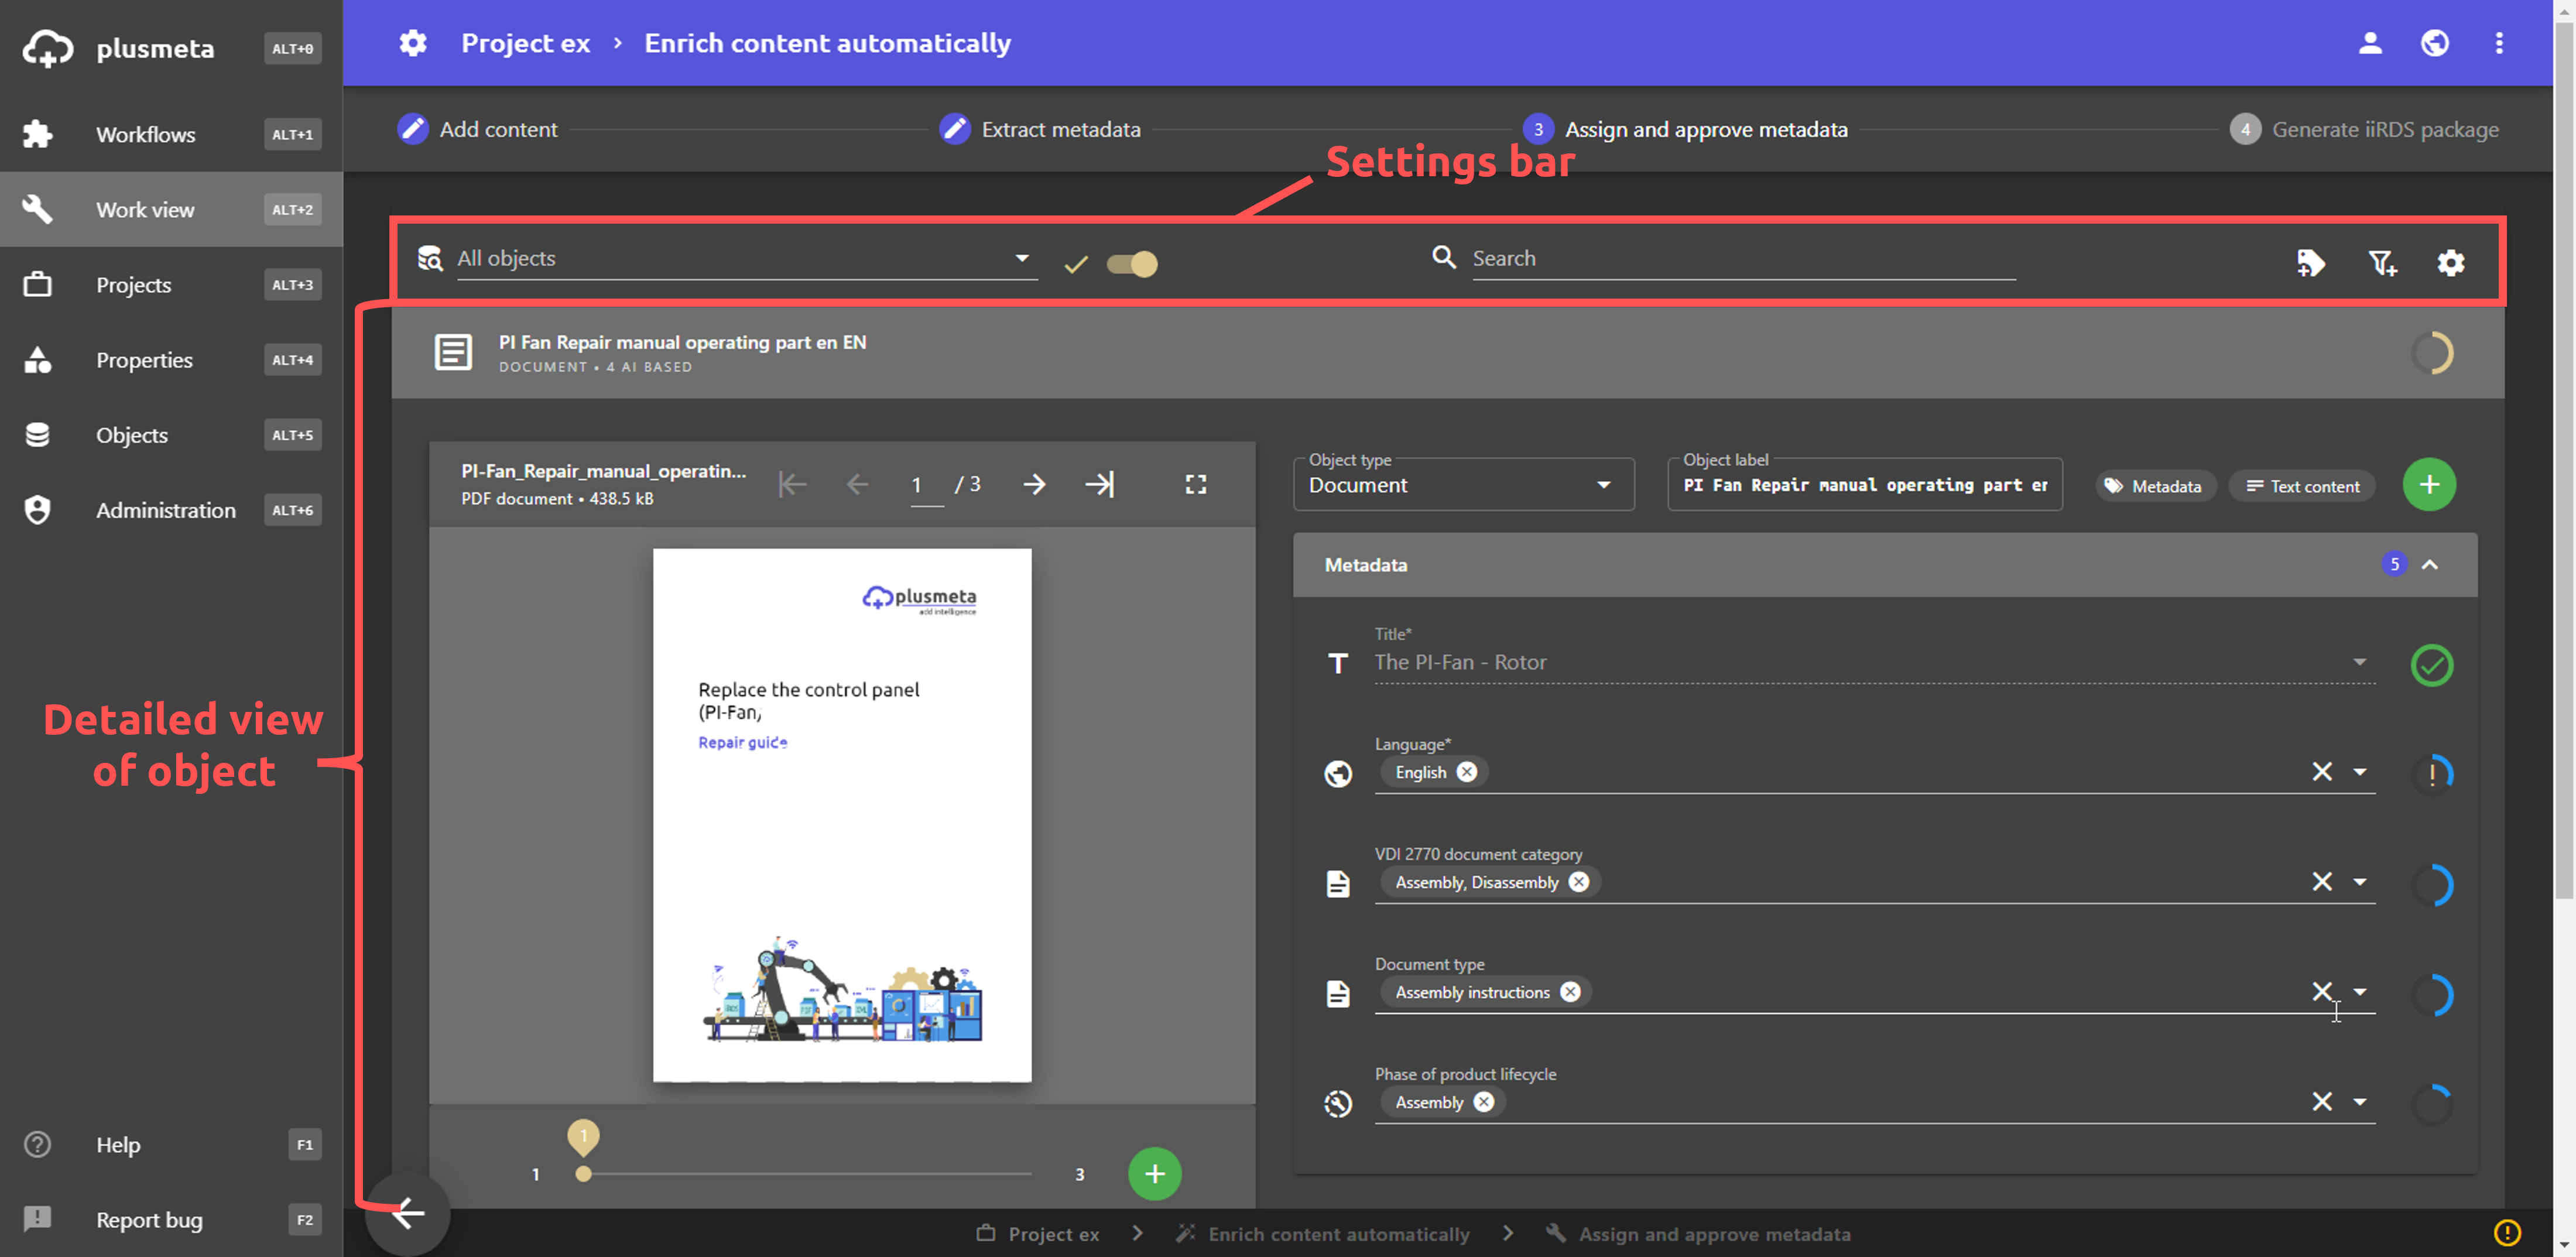
Settings bar
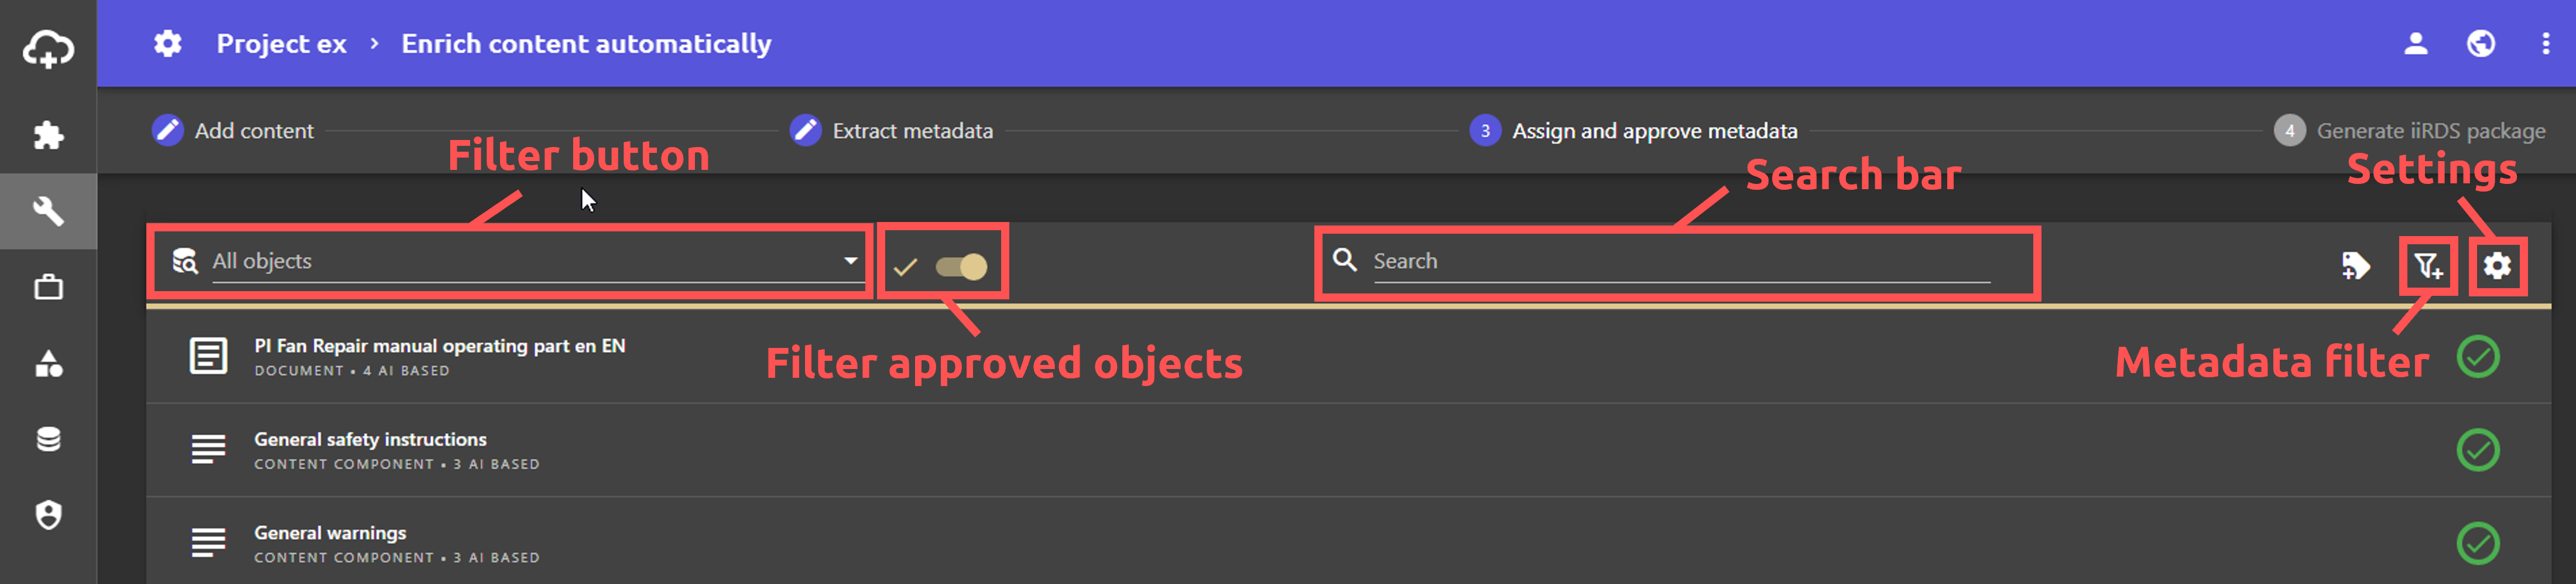
You can use the settings bar to filter the objects displayed below based on various characteristics. This allows you to maintain an overview even for larger projects and make it easier to find specific objects. In addition, the settings bar offers various functions for customizing the view and exporting the metadata.
- The object type filter is located on the left-hand side of the bar. You can use this to filter which object types are displayed.
- Next to the object type filter there is a beige check mark and a switch with which you can hide objects that have already been approved. This is useful when working on many objects in multiple sessions.
- The search bar is located in the middle. This can be used to search for objects. In addition to the display name, the extracted text content and the metadata are also searched.
- The function Assign metadata to multiple objects is located on the right-hand side. You can use this function to manually assign metadata to all objects or a selection of objects.
- To the right of this in the settings bar is the metadata filter. This filter can be used to filter the objects according to specific metadata. This means that only objects that have been assigned the set metadata are displayed.
- The settings menu is located on the far right.
Settings menu
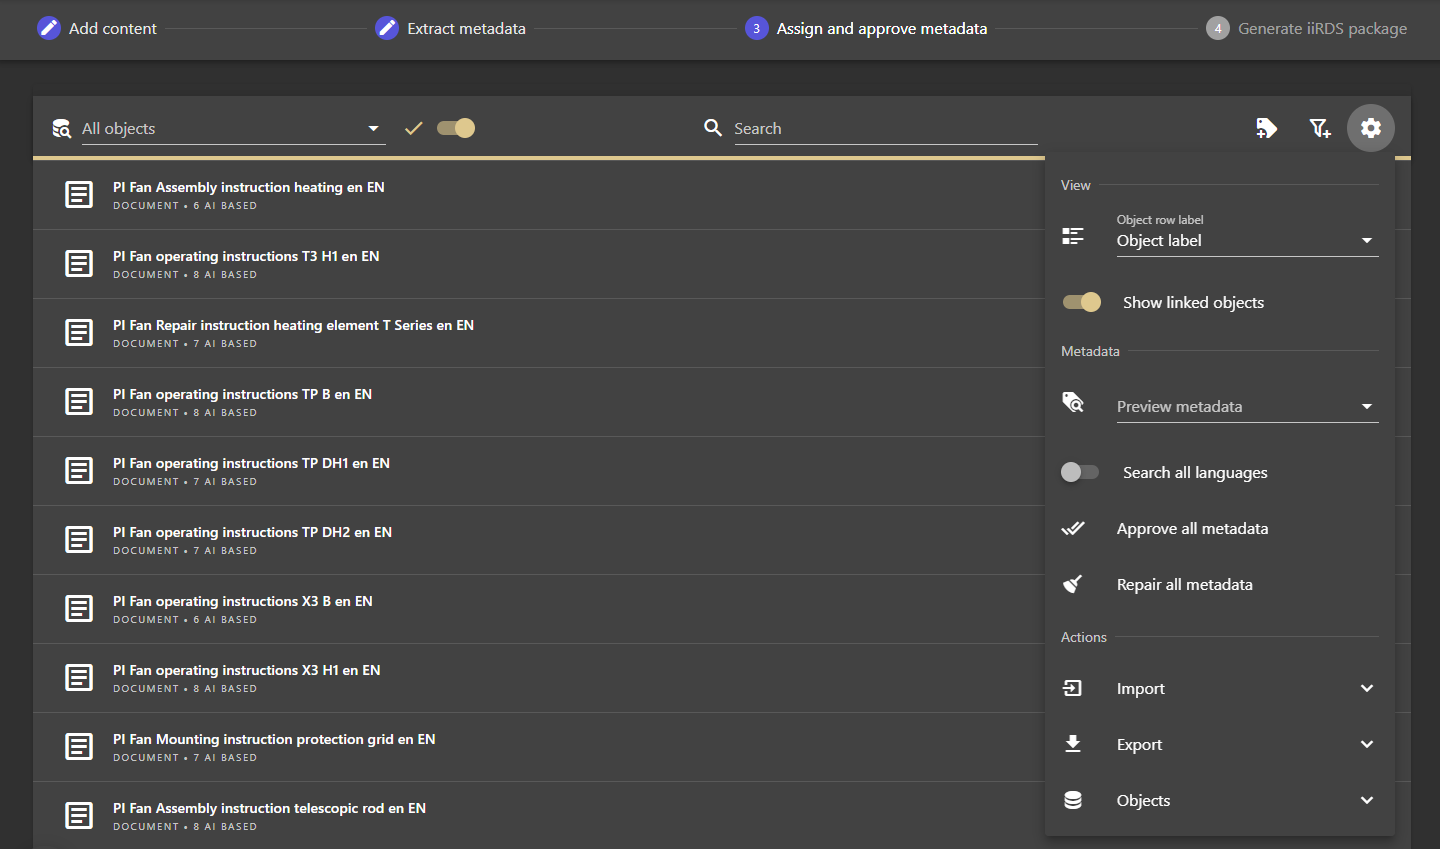
If you click on the gear icon on the far right of the settings bar, the settings menu opens. This menu contains various functions:
- Display
- Object row label: You can use the drop-down list to select an object label for the objects.
- Show linked objects: Here you can specify whether linked objects are displayed or not.
- Metadata
- Preview metadata: You can use the drop-down list to set which metadata is displayed as a preview when objects are collapsed.
- Search all languages: By default, plusmeta only searches labels of the UI language when searching for values within a metadata field. If this switch is activated, the labels are searched in all languages. For example, an English list entry can also be found via the German label.
- Approve all metadata: Here you can approve all required metadata at once.
- Repair all metadata: Here you can repair all required metadata at once.
- Actions
- Import: Here you can assign metadata with Excel.
- Export: Here you can export metadata. Metadata can be exported either as a CSV or JSON file.
- Objects: Here you can rename the source files of the objects. You can either rename all source files or rename only unlinked objects.
Attention: The file name of the source file will be overwritten. The action cannot be undone.
Detail view
Click on a collapsed object row to open the detail view below. The detail view therefore always refers to one object. In the detail view, you can check, add to and remove the extracted metadata, display a preview of the document and adjust the object type and the display name of the object.
- When expanded, a file preview (for compatible files) is displayed. Click on the small preview of the object to get a larger view.
- The extracted metadata is listed to the right of the file preview. Next to each metadata field, a metadata indicator shows the origin, confidence and extraction method of the metadata.
- The object label of the object is displayed both at the top of the object row and below it in the expanded detail view. This can be adjusted manually in the detail view.
- The object type of the object is also displayed. This can also be changed here.
- The Metadata button opens the metadata dialogue, which can be used to display additional information on all of the object's metadata.
- The Text content button opens the text content dialogue, which can be used to display, copy and search through the extracted text of the object.
- You can add further metadata classes using the Add button . You can find out more here .
- The sequence of the metadata fields is configurable.
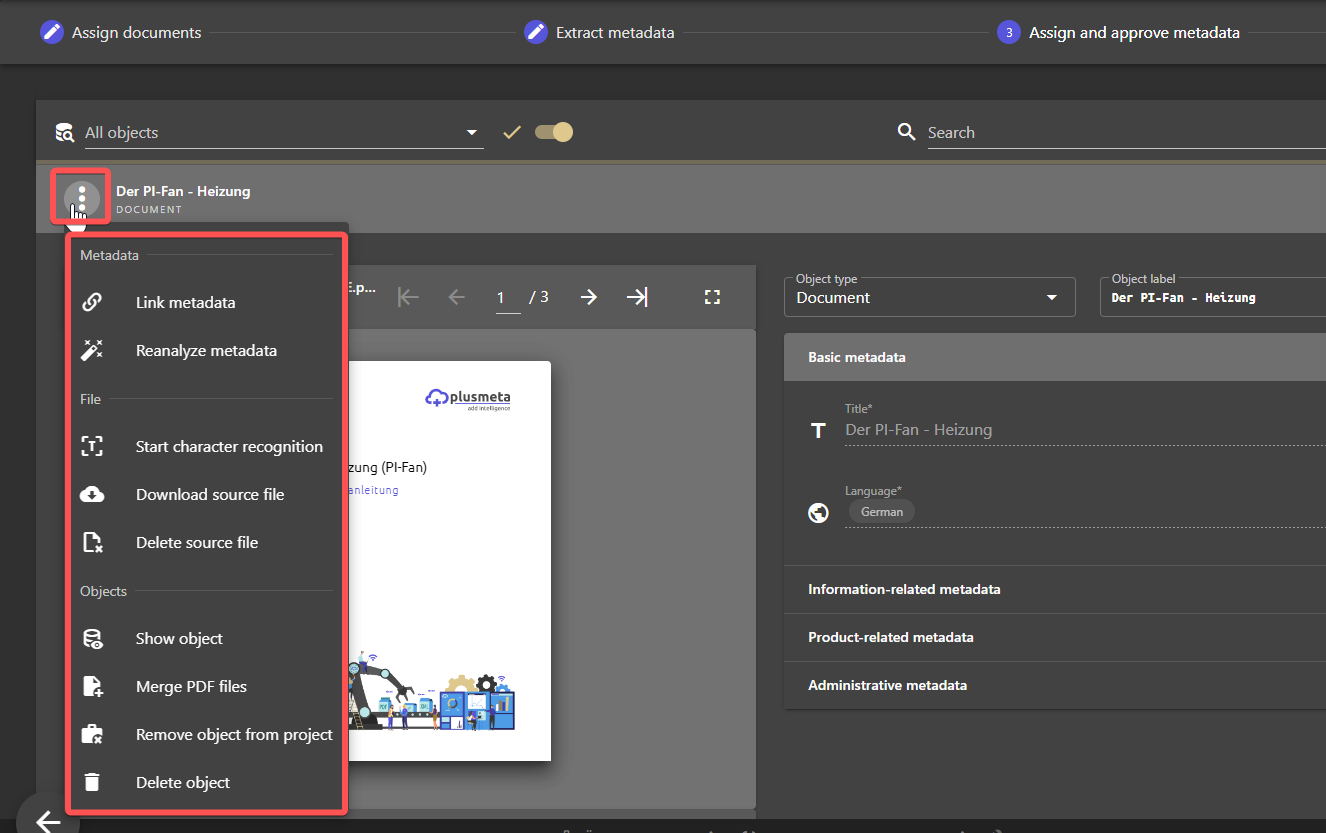
Object menu
If you move the mouse over the object icon, a button appears. You can open the object menu by clicking on the button. This menu contains various functions for the object:
- Metadata
- Link metadata: Here you can link the metadata of the object with the metadata of another object. The button is only visible if the function is enabled via the corresponding right.
- Reanalyze metadata: Here you can run the metadata extraction for the object again.
- File
-
Start character recognition: Use this button to start the optical character recognition (OCR), for example if the file has been scanned and does not contain any digital text. A paid plugin is required for this function.
- Download source file: Use this button to download the file contained in the object.
- Delete source file: Use this button to permanently delete the file contained in the object from plusmeta. The object and the metadata are retained. A new source file can be uploaded to the object.
-
- Objects
- Show object: Click on the button to open the object view. This is a read-only view with all information about the object.
- Merge PDF files: By clicking on the button, you can select additional objects that you would like to merge with the selected object in a PDF. plusmeta then creates a new object containing the merged PDF.
- Remove object from project: Use this button to remove individual objects from the project. The objects are retained in the objects view in the plusmeta platform and can therefore be added to projects again at any time.
- Delete object: Use this button to remove individual objects from plusmeta. If the object is used in another project, it will also be deleted.
Edit and approve extracted metadata
You can approve, edit, remove and delete the extracted metadata in the detail view. You can find out more on this help page.
For certain metadata, you can insert a list of entries all at once. This option is available if the button is next to the metadata field.
Approval status
The approval status is displayed in the form of a circle on the right-hand side of the individual objects. It indicates how far the approval of an object has progressed. The beige outline indicates the percentage of required metadata that has already been approved.
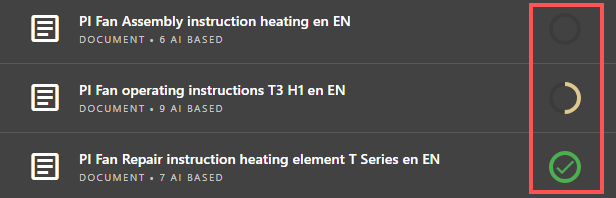
- Once half of the required metadata has been approved, half of the circle outline appears beige.
- Once all required metadata has been approved, the circle outline appears green and a green tick appears in the circle.
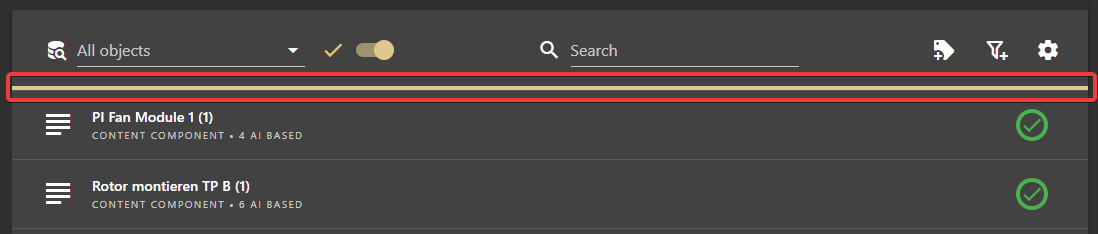
The beige progress bar at the top of the view shows the overall approval status of all objects in the project. When half of all objects have been approved, the line is half full.
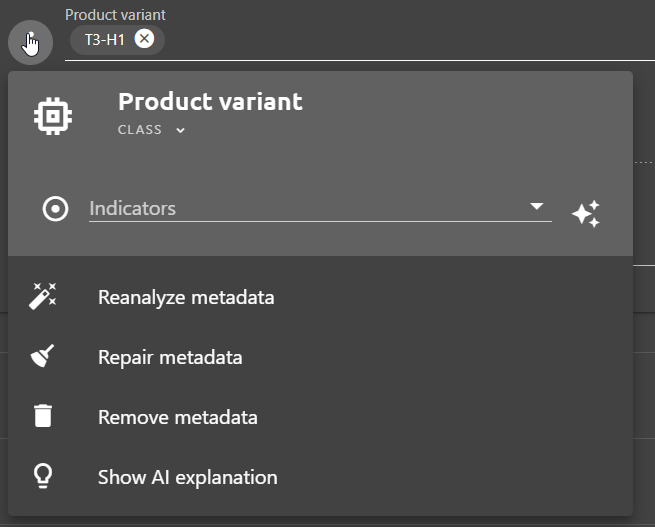
Metadata wizard
The metadata wizard can be used to get more information and perform additional actions for each metadata item.
- The metadata wizard can be opened by clicking on the metadata icon.
- Additional information about the metadata is displayed at the top of the Metadata wizard, such as the relations used to assign the metadata.
- Below this are buttons that can be used to delete the metadata, for example. You can find out more here.
Validation
In the workflow step Assign and approve metadata, validation ensures that you meet all the requirements of the workflow. Which criteria the validation checks is workflow-dependent and configurable.
-
In the workflow Enrich content automatically, the requirement is that at all required metadata must be approved.
-
In the Create VDI 2770 package workflow, validation is much more complex. Validation ensures that the standard specifications are met. For example, the system checks whether an instance product reference exists for each product variant.
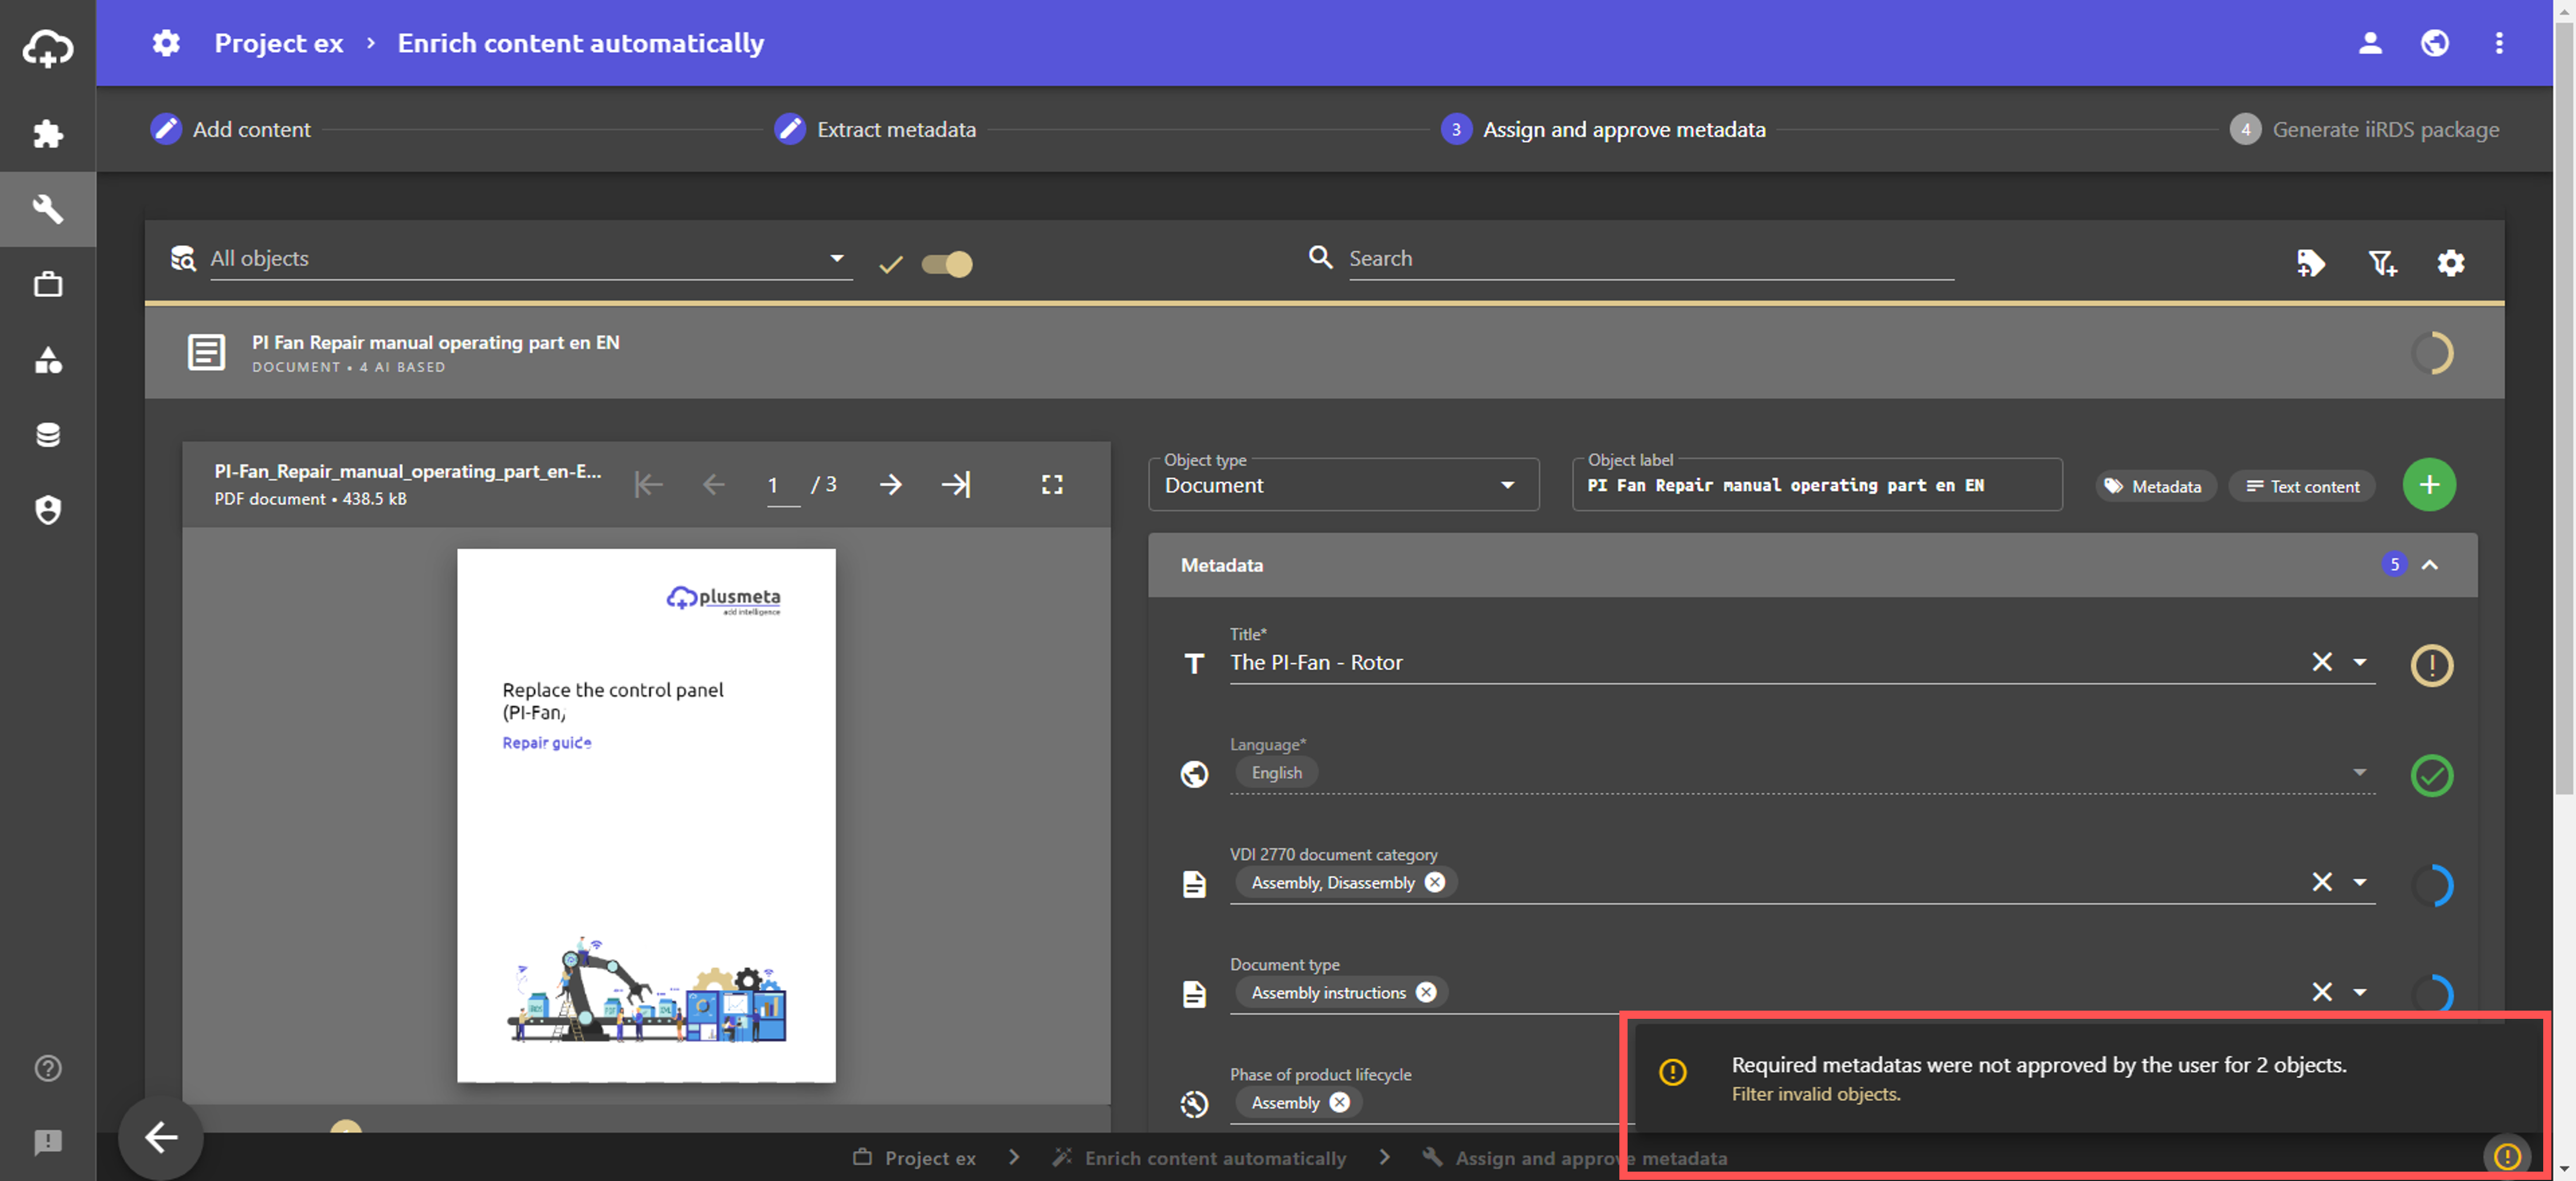
Only when you have fulfilled all validation requirements will the arrow appear at the bottom right, which takes you to the next workflow step.
Clicking on the button opens a message indicating which validation requirements have or have not been met. If you click on the message, the view is filtered according to the request. You will only see the objects that do not yet meet the validation requirements.