Content of this topic
Basics
With template strings, metadata values from different metadata can be combined into a new metadata. Filters, substrings and fallback values can be used for this purpose The generated strings can be used to create new properties in plusmeta.
Configure template strings
Template strings are created via a configuration object.
- Open the objects view .
- Click on the Add button to create a new object.
- Select Configuration object as the object type.
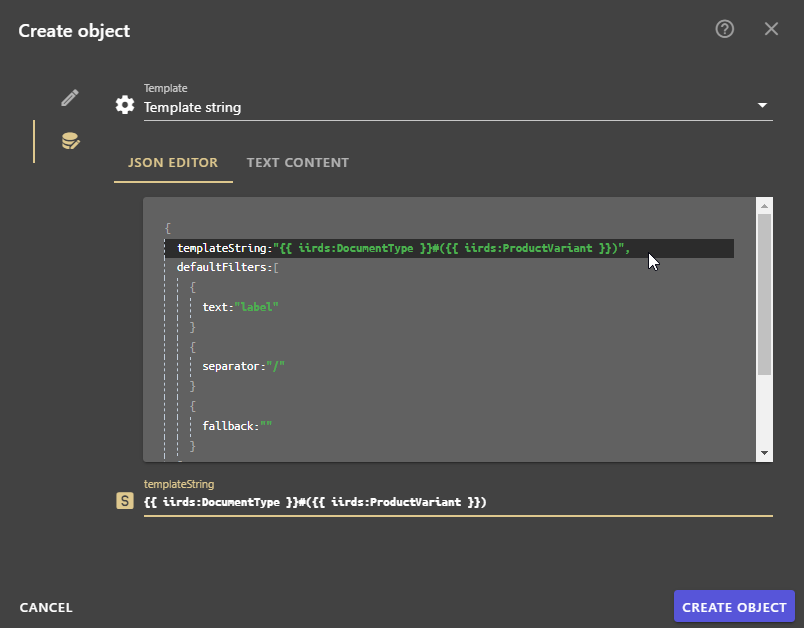
- Open the lower tab of the Create object dialog.
- Select the template Template string.
- In the JSON editor in the Template String element, reference the identifiers of the metadata with double curly brackets and spaces. Example:
templateString: "{{ iirds:DocumentType }}#{{ iirds:ProductVariant }}" - Enter filters or combined filters in the defaultFilters field. Example:
text: publicName - Switch back to the Edit tab and assign an Object label.
Note: The drop-down list suggests titles according to the object type and template selected.
- Click on CREATE OBJECT .
Apply filter
Filters offer additional options for controlling the output of the Template string. In the configuration object, filters can be set in the templateString area (local filter) and in the defaultFilters area (global filter).
- In the
templateStringarea, local filters can be used to change the output of individual metadata. - In the
defaultFiltersarea, global filters can be used to define changes for all metadata referenced in the “templateString”.Note: Local filters override global filters - fallback
Values that are specified if no value is set for a metadata.- String value: If a specific string value is to be output as a local fallback for a metadata, the string value must be enclosed in quotation marks. e.g.
fallback: "string value" - other metadata: If the value of another metadata is to be output as a local fallback for a metadata, the identifier of the metadata must be specified without quotation marks. e.g.
fallback: "plus:Organization" - Default value: “”
- String value: If a specific string value is to be output as a local fallback for a metadata, the string value must be enclosed in quotation marks. e.g.
- text
Text of the property that is output.- Possible values:
label,publicName,externalName,identifier - Default value:
label
- Possible values:
- substring
Value at which the text is cropped.- Number of maximum characters per property text:
- Default value:
100
- separator
Separator that is used for multiple values.- If a specific separator is to be output for multiple values, the separator must be enclosed in quotation marks. e.g.
seperator: "_" - Default value:
"/"
- If a specific separator is to be output for multiple values, the separator must be enclosed in quotation marks. e.g.
- prepend
Separator to be output before the metadata.- If a specific separator is to be placed before a metadata, the separator must be enclosed in single quotation marks, e.g.
zp:product-name | prepend: '/' - Use case: If a metadata does not provide a value, the separators surrounding the empty metadata should be prevented from being displayed.
- If a specific separator is to be placed before a metadata, the separator must be enclosed in single quotation marks, e.g.
- append
Separator that is to be output after the metadata.- If a specific separator is to be placed before a metadata, the separator must be enclosed in single quotation marks, e.g.
zp:product-name | prepend: '/' - Use case: If a metadata does not provide a value, the separators surrounding the empty metadata should be prevented from being displayed.
- If a specific separator is to be placed before a metadata, the separator must be enclosed in single quotation marks, e.g.
Create Template string values as list values
In order to be able to create the template string directly as a list value, adjustments must be made to the configuration object.
- The configuration object Open template string .
- Set the JSON editor in the
composedStringAsPropertyIdentifierelement totrueto control whether the value of the string value is actually created as a new list value. - Set the
withSourceMetadataAttributeselement totrueorfalseto control whether the Attributes area is entered for the generated list value, from which metadata the list entry was generated. - In the
composedPropertyNamespacePrefixelement, enter the namespace that the newly created list value should have, e.g."pi". - Open the Properties view .
- Select the property that is linked to the configuration object and open the edit view .
- Change the data type to class .
- Check the string value in the workflow step Assign and approve metadata .
Apply string value
To use the string value, it must be linked to a configured metadata.
- Switch to the Properties view .
- Open the metadata to be filled by the string value for editing .
- In the tab, ensure that the metadata has the data type string value .
- In the tab, add the relation dependent on property .
- Enter the metadata stored in the configuration object in the relation target field to ensure that the string value is only created if at least one of the specified metadata is present.
- Add the relation uses configuration and select the created configuration object as the target.